 1 arch安装virtualbox很简单
 2
 3 $ sudo pacman -S virtualbox
 4 如果想用图形界面的话,得安装
 5 $ sudo pacman -S qt
 6 安装增强包(arch linux vitualbox guest)
 7 $ sudo pacman -S virtualbox-additions
 8 $ yaourt virtualbox-ext-oracle
 9
10
11 把自己加入virtualbox组:
12
13 $ sudo gpasswd -a USERNAME vboxusers
14
15 编译vbox的模块
16
17 $ sudo rc.d setup vboxdrv
18
19 然后把模块加入启动模块,编辑/etc/rc.conf
20
21 MODULES=(... vboxdrv)
22
23 也可以手动加载模块:
24
25 $ sudo modprobe vboxdrv
26
27 然后启动virtualbox:
28
29 $ virtualbox
30
31 guest机器启动后默认的是NAT模式的网络,如果要使用Briged(桥接模式)的网络的话,得启用vboxnetflt模块:
32
33 $ sudo modprobe vboxnetflt
34
35 也可以把vboxnetflt加入启动模块,编辑/etc/rc.conf
36
37 MODULES=(... vboxdrv vboxnetflt)
38
39 文件共享
40 对于windows:
41
42 net use x: \\VBOXSVR\sharename
43
44 对于linux guest:
45
46 # mount -t vboxsf [-o OPTIONS] sharename mountpoint
47   (注意:共享名是任意的,或者和VirtualBox对话框中选定的一样(在主机端文件系统中共享目录的挂载点)。
48
49 选项可以添加字符集,如:
50     nls=utf8
51     #或者iocharset=utf8
52     #nls是iocharset的新名字
53
54 如果开机就连上共享的话,编辑/etc/fstab,添加如下:
55
56 sharename mountpoint vboxsf uid=#,gid=# 0 0
57
58 uid和gid后面要添加实际的用户id和组id.
59
60 一些常用命令:
61 列出虚拟主机:
62 $ VboxManager list
63 启动虚拟主机:
64 $ VboxManager startvm vm-name
65
66 你还可以使用web浏览器控制虚拟机:
67 PhpVirtualBox – ArchWiki
68
69
70 更多内容参考:
71
72 VirtualBox – ArchWiki
Friday, September 30, 2011
arch install virtualbox
Wednesday, September 28, 2011
arch build system-howto
arch的安装包管理机制类似debian的deb包管理机制

昨天ibus更新导致无法激活中文输入,上irc问了问才知道需要重新编译ibus-sunpinyin.

于是 https://wiki.archlinux.org/index.php/ABS 根据wiki学习了一下.

首先需要安装abs
# pacman -S abs
然后安装编译环境
# pacman -S base-devel

然后根据需要编辑/etc/abs.conf
# vim /etc/abs.conf
去除你想编译的包的源,比如:
REPOS=(core extra community !testing)

接着下载ABS tree
# abs
你的ABS tree 将在/var/abs目录创建.

你也可以单独下载你需要编译的软件包:
# abs <repository>/<package>
(比如 # abs community/ibus-sunpinyin)

The ABS tree

When you run abs for the first time, it synchronizes the ABS tree on the Arch Linux server to your computer. The ABS tree is an SVN directory hierarchy located under /var/abs and looks like this:

| -- core/
|     || -- base/
|     ||     || -- acl/
|     ||     ||     || -- PKGBUILD
|     ||     || -- attr/
|     ||     ||     || -- PKGBUILD
|     ||     || -- ...
|     || -- devel/
|     ||     || -- abs/
|     ||     ||     || -- PKGBUILD
|     ||     || -- autoconf/
|     ||     ||     || -- PKGBUILD
|     ||     || -- ...
|     || -- ...
| -- extra/
|     || -- daemons/
|     ||     || -- acpid/
|     ||     ||     || -- PKGBUILD
|     ||     ||     || -- ...
|     ||     || -- apache/
|     ||     ||     || -- ...
|     ||     || -- ...
|     || -- ...
| -- community/
|     || -- ...

The ABS tree has exactly the same structure as the package database:

    First-level: Category directories
    Second-level: Package name directories
    Third level: PKGBUILD (contains information needed to build a package) and other related files (patches, other files needed for building the package)

The source code for the package is not present in the ABS directory. Instead, the PKGBUILD file contains a URL that will download the source code when the package is built.

创建软件目录
$ mkdir -p $HOME/abs
然后拷贝你需要编译的软件到你的abs目录(比如ibus-sunpinyin)
$ cp -r /var/abs/community/ibus-sunpinyin ~/abs
然后进入工作目录
$ cd ~/abs/ibs-sunpinyin
编辑PKGBUILD文件(add or remove support for components, to patch or to change package versions, etc. (optional):)
$ vim PKGBUILD
然后以普通用户编译(with -s switch to install with automatic dependency handling)
$ makepkg -s
然后以root安装
# pacman -U ibus-sunpinyin-2.0.3-1-x86_64.pkg.tar.xz
firefox search engines for arch linux
install arch-firefox-search to get firefox arch search engines(aur,pkgs,bbs,wiki,etc)
ibus 1.4 can't input chinese
update the ibus to 1.4 ,so can't trigger the sunpinyin to input chinese
through the irc find this https://bbs.archlinux.org/viewtopic.php?pid=995934#p995934
bug report https://bugs.archlinux.org/task/26124
so rebuild the ibus-sunpinyin to fix this problem
https://wiki.archlinux.org/index.php/ABS
through the irc find this https://bbs.archlinux.org/viewtopic.php?pid=995934#p995934
bug report https://bugs.archlinux.org/task/26124
so rebuild the ibus-sunpinyin to fix this problem
https://wiki.archlinux.org/index.php/ABS
Monday, September 26, 2011
Saturday, September 24, 2011
screen keybindings (screen常用快捷键)
5.1 Default Key Bindings
As mentioned previously, each keyboard command consists of a C-a followed by one other character. For your convenience, all commands that are bound to lower-case letters are also bound to their control character counterparts (with the exception of C-a a; see below). Thus, both C-a c and C-a C-c can be used to create a window.The following table shows the default key bindings:
- C-a '
- (select)
Prompt for a window identifier and switch. See Selecting. - C-a "
- (windowlist -b)
Present a list of all windows for selection. See Selecting. - C-a 0...9, -
- (select 0...select 9, select -)
Switch to window number 0...9, or the blank window. See Selecting. - C-a
- (focus)
Switch the input focus to the next region. See Regions. - C-a C-a
- (other)
Toggle to the window displayed previously. If this window does no longer exist,otherhas the same effect asnext. See Selecting. - C-a a
- (meta)
Send the command character (C-a) to window. Seeescapecommand. See Command Character. - C-a A
- (title)
Allow the user to enter a title for the current window. See Naming Windows. - C-a b
- C-a C-b
- (break)
Send a break to the tty. See Break. - C-a B
- (pow_break)
Close and reopen the tty-line. See Break. - C-a c
- C-a C-c
- (screen)
Create a new window with a shell and switch to that window. See Screen Command. - C-a C
- (clear)
Clear the screen. See Clear. - C-a d
- C-a C-d
- (detach)
Detachscreenfrom this terminal. See Detach. - C-a D D
- (pow_detach)
Detach and logout. See Power Detach. - C-a f
- C-a C-f
- (flow)
Cycle flow among ‘on’, ‘off’ or ‘auto’. See Flow. - C-a F
- (fit)
Resize the window to the current region size. See Window Size. - C-a C-g
- (vbell)
Toggle visual bell mode. See Bell. - C-a h
- (hardcopy)
Write a hardcopy of the current window to the file “hardcopy.n”. See Hardcopy. - C-a H
- (log)
Toggle logging of the current window to the file “screenlog.n”. See Log. - C-a i
- C-a C-i
- (info)
Show info about the current window. See Info. - C-a k
- C-a C-k
- (kill)
Destroy the current window. See Kill. - C-a l
- C-a C-l
- (redisplay)
Fully refresh the current window. See Redisplay. - C-a L
- (login)
Toggle the current window's login state. See Login. - C-a m
- C-a C-m
- (lastmsg)
Repeat the last message displayed in the message line. See Last Message. - C-a M
- (monitor) Toggle monitoring of the current window. See Monitor.
- C-a
- C-a n
- C-a C-n
- (next)
Switch to the next window. See Selecting. - C-a N
- (number)
Show the number (and title) of the current window. See Number. - C-a p
- C-a C-p
- C-a C-h
- C-a
- (prev)
Switch to the previous window (opposite of C-a n). See Selecting. - C-a q
- C-a C-q
- (xon)
Send a ^Q (ASCII XON) to the current window. See XON/XOFF. - C-a Q
- (only)
Delete all regions but the current one. See Regions. - C-a r
- C-a C-r
- (wrap)
Toggle the current window's line-wrap setting (turn the current window's automatic margins on or off). See Wrap. - C-a s
- C-a C-s
- (xoff)
Send a ^S (ASCII XOFF) to the current window. See XON/XOFF. - C-a S
- (split)
Split the current region into two new ones. See Regions. - C-a t
- C-a C-t
- (time)
Show the load average and xref. See Time. - C-a v
- (version)
Display the version and compilation date. See Version. - C-a C-v
- (digraph)
Enter digraph. See Digraph. - C-a w
- C-a C-w
- (windows)
Show a list of active windows. See Windows. - C-a W
- (width)
Toggle between 80 and 132 columns. See Window Size. - C-a x
- C-a C-x
- (lockscreen)
Lock your terminal. See Lock. - C-a X
- (remove)
Kill the current region. See Regions. - C-a z
- C-a C-z
- (suspend)
Suspendscreen. See Suspend. - C-a Z
- (reset)
Reset the virtual terminal to its “power-on” values. See Reset. - C-a .
- (dumptermcap)
Write out a .termcap file. See Dump Termcap. - C-a ?
- (help)
Show key bindings. See Help. - C-a C-\
- (quit)
Kill all windows and terminatescreen. See Quit. - C-a :
- (colon)
Enter a command line. See Colon. - C-a [
- C-a C-[
- C-a
- (copy)
Enter copy/scrollback mode. See Copy. - C-a ]
- C-a C-]
- (paste .)
Write the contents of the paste buffer to the stdin queue of the current window. See Paste. - C-a {
- C-a }
- (history)
Copy and paste a previous (command) line. See History. - C-a >
- (writebuf)
Write the paste buffer out to the screen-exchange file. See Screen Exchange. - C-a <
- (readbuf)
Read the screen-exchange file into the paste buffer. See Screen Exchange. - C-a =
- (removebuf)
Delete the screen-exchange file. See Screen Exchange. - C-a _
- (silence)
Start/stop monitoring the current window for inactivity. See Silence, - C-a ,
- (license)
Show the copyright page. - C-a *
- (displays)
Show the listing of attached displays.
irssi scripts (irssi常用插件介绍)
现在使用irssi上irc,配合screen码字,再使用vim写代码很方便.
irssi的插件很方便,直接在 http://scripts.irssi.org/下载,然后放到~/.irssi/scripts下就可以了,然后在irssi中调用/script load调用插件(/run在新版本使用),如果想脚本自动调用的话就进入~/.irssi/scripts/autorun目录,然后ln -s ../yourscripts.pl 就可以了
我常用的几个插件如下
nickcolor.pl-----nickname彩色显示
nicklist.pl----在使用screen的时候,把channel中的nickname在右边显示命令格式:/nicklist screen
notify.pl---当有提到你的名字的消息的时候,在桌面发个小提示
Saturday, September 17, 2011
linux下使用ssh tunnel来翻墙
首先在www.ssh4gfw.com注册帐号察看这个链接

然后使用的来的帐号密码可以建立ssh tunnel(ssh隧道)了,速度还可以而且是免费的.

ssh -v -CNgD 7070 username@server

其中:

    -v verbose,显示详细信息;
    -C Requests compression  of  all  data,压缩传输数据;
    -N Do  not  execute a remote command,不运行远程程序。即通知 sshd 不运行设定的 shell;
    -g Allows remote hosts to connect to local forwarded ports,允许远程主机链接本地端口;
    -D Specifies a local “dynamic” application-level port forwarding,建立tunnel,监听本地端口;

    ——–可选参数——–
    -q quiet,安静模式;
    -f Requests ssh to go to background just before command  execution, ssh在后台运行,即认证之后,ssh退居后台;
    -n Redirects stdin from /dev/null,将 stdio 重定向到 /dev/null,与-f配合使用

最简方案:(不推荐)
1
    ssh -D 7070 username@server

不论是 windows 还是 linux,只要 ssh 登录成功就可以进行下一步啦~

ssh自动输入密码登陆的方法:

1. 通过rsa密匙验证(配置家单,并且ssh,scp,sftp等登陆都面去了输入密码的麻烦)

    1,生成rsa的密匙.
    $ssh-keygen -t rsa

    2,将公匙存放到服务器上(注意存放目录位置)
    $scp ~/.ssh/id_rsa.pub username@server:~/.ssh/authorized_keys

    大功告成!通过ssh登陆,通过scp或者sftp传输文件啥的都不用再输入密码了!

2.安装sshpass

    1,安装sshpass
    Debian系的linux
    $sudo apt-get install sshpass
    Arch
    $sudo yaourt sshpass

    2,使用方法
    $sshpass -p password ssh username@server

    使用-p指定密码,还需要在后面跟上标准的ssh链接命令


我使用了上面的第2中方法,第1种方法还需要上传公匙,我发现我没法上传到ssh4gfw上

使用下面的命令就可以很简单的使用ssh代理了

$sshpass -p password ssh -v -CNgD 7070 username@ww.ssh4gfw.com

然后在firefox中把about:config中的network.proxy.socks_remote_dns设为true来防止dns污染

然后设置autoproxy(福)添加新代理,使用127.0.0.1,socks 5,端口7070就可以使用代理咯

ssh tunnel(ssh隧道)的原理的简单图式

Youtube/facebook/====ssh代理服务器====GFW=====user
                 80/443端口           22端口

ssh本来就是全程加密传输,所以在22端口传输的数据包裹上80端口的内容,就好像在打条隧道一样,很简单吧.这样就可以很容易的突破网络封锁了.

下面说说给ssh tunnel的帐号建立最小的权限
 1,在服务器新建立一个user
  # useradd -s /bin/false username
 2,设置密码
  # passwd username
 3,修改/etc/passwd文件:把用户的shell设置为/usr/bin/passwd
 4,把/usr/bin/passwd这一行写入/etc/shells
  # echo "/usr/bin/passwd" >> /etc/shells
使用/usr/bin/passwd作为用户的shell,这样用户就可以通过登陆自主修改密码,但是用户没有权限运行其他命令(sshd 认证通后之后,会检查设定的shell是否登记在/etc/shells文件中,若已经登记,则fork自己,然后fork出来的子进程再exec设定的shell).此时账号username可以通过sshd的认证使用TcpForwarding,但是不能运行shell,不能与系统交互.可以安全而快速的为用户提供ssh 代理.
arch安装配置sshd
分辨:OpenSSH和OpenSSL

 这2者不但只差1个字母,用途却惊人的相似-提供开源的加密通讯解决方案.

 正如名称介绍的,2者均为开源跨平台软件,OpenSSH是隶属于OpenBSD的SSH协议加密数据传输项目,而OpenSSL则是网景的加密畅想开源实现.

 我们更多的时候实在web浏览器中使用SSL加密访问网站,在终端之中用OpenSSH(ssh)加密登陆到服务器.

 更多的阅读 ssh && ssl [wikipedia.org]

安装OpenSSH

 Arch下通过这个命令,就可以将OpenSSH安装到你的计算机中:
    pacman -S openssh

 你可以顺便熟悉一下ssh的基本操作
    man ssh

 当然现在就可以使用ssh登陆你有帐号的主机了
    ssh -p port user@server-address

配置ssh

 Arch下ssh的全局配置文件在:/etc/ssh/ssh_config
 个人的配置文件在:~/.ssh/config

 至于配置文件你可以询问man了,其中比较有用的一条是:
把# Protocol 2,1 改为 Protocol 2(表示只有协议2将被使用,协议1被认为不太安全.


配置Daemon

 sshd的配置文件位于:/etc/ssh/sshd_config

 你可以修改配置文件来实现:变更ssh监听端口,密码错误尝试次数,是否允许root登陆等操作,重启sshd是配置生效.

 比如你只想允许某些用户登陆,请在文件中加入这行:
    AllowUsers  user1 user2
 禁止root登陆进SSH,加入下面的一行:
    PermitRootLogin no
 当然你可以取消在/etc/issue文件中BANNER前面的注释来显示欢迎信息.

 如果你开启了你本机的sshd服务可以使用nmap -PO 127.0.0.1来察看你所使用的sshd所使用的端口.
*当然你可以改变默认的服务端口22到一个别的端口比如888
*完全取消密码登陆方式可以增强安全性,因为每个服务器的用户都需要创建ssh密匙
    /etc/ssh/sshd_config

    PasswordAuthentication no
    ChallengeResponseAuthentication no

允许其他主机进入

 *你必须改变你的文件,因为默认的这2个文件是空的.

 为了让其他人通过ssh登陆到你的机器,你必须设置/etc/hosts.allow文件,加入下面类似的内容
 # 让每个人都能连接到你
 sshd: ALL

 # 或者限制只能特定的ip能够
 sshd: 192.168.0.1

 # 或者限制ip段
 sshd: 10.0.0.0/255.255.255.0

 # 或者限制为IP匹配
 sshd: 192.168.1.

 现在检查你的“/etc/hosts.deny”文件,找到并确保有类似下面一行的内容:

    ALL: ALL

 你能SSH出去别人也应该能够SSH进来:)。

 开始使用新的配置之前,要先重启守护进程(以root身份):

    # rc.d restart sshd

管理SSHD Daemon

 这样把sshd加入到/etc/rc.conf的"DAEMONS"中就可以开机启动了
    DAEMONS=(... ... sshd ... ...)

 启动/重启/关闭这个服务,可以使用:
    # rc.d {start|restart|stop} sshd
Arch ssh配置 [wiki.archlinux.org]
Friday, September 16, 2011
arch linux 基于cairo-ubuntu的自己美化
archlinux的字体还是显示的有问题!


前几天使用了网上的那个帖子介绍的方法复制了.fonts.conf到自己的目录下.
结果显示的一塌糊涂,还不如原来的好看呢.结果把原来的配置也破坏了.

于是重新把gnome3的配置文件(~/.config/dconf/  ~/.gconf/ ~/.gconfd/)
删除掉才可以,然后重新配置.

首先还是安装 ttf-dejavu 和wqy-miacrohei 2种字体

然后 安装 ubuntu打了lcd补丁的cairo

    yaourt -S cairo-ubuntu

一个命令,yaourt就会自动安装fontconfig-ubuntu,freetype2-ubuntu,libxft-ubuntu
这3个带补丁的包

这个包提供了3种可选的方案,可以使用下面的方法选用其中一种

    cd /etc/fonts/conf.d/
    sudo ln -s ..conf.avail/10-hinting-<新方案名>.conf ./
    sudo rm 10-hinting-<原方案名>.conf

来实现可选渲染方案的切换.
默认的方案名是slight,可选的方案名总共包括:slight medium full
批量修改文件目录权限 bash chmod
 1 我有一些在NTFS分区复制的文件,文件层次和数量都非常多;因为普通文件它都带执行权限属性,我现在想改变一下权限。
 2 要求就是:
 3 1、将当前目录中的所有“子目录”的权限设置为755;
 4 2、将当前目录中的所有“文件”的权限设置为644。
 5
 6 谢谢。
 7
 8 已经解决。方案:
 9 chmod 644 -R *
10 chmod 755 `find -type d`
11
12 用find彻底些
13 find /path -type f -exec chmod 644 {} \;
14 find /path -type d -exec chmod 755 {} \;
15
16 假设我们要把所在目录下的所有目录的权限递归设置为755,我们可以这样写(两条语句的功能一样的):
17 1、 find -type d -exec chmod 755 {} \;    (这句的句末有分号)
18 2、 find -type d|xargs chmod 755
19 假如我们要把所在目录下的所有文件权限递归地改成644:
20 1、 find -not -type d -exec chmod 644 {} \;
21 2、 find -not -type d|xargs chmod 644
autoreboot my tp-link router 320g+
 1 自动重启我的路由器,家里的无线路由是tp-link 320G+,当开机时间过长的话就会断网
 2
 3 于是就想让它过一定的时间自动重启.
 4
 5 思路很简单:就是用python的urllib库获取网页然后提交特定的命令就可以了
 6
 7 于是就上网搜索了搜索,找到了如下的代码.
 8
 9 使用python的示例如下
10
11 import urllib
12
13 print urllib.urlopen("http://admin:admin @ 192.168.1.1 /userRpm/MenuRpm.htm?MainID=0&SubID=0 ").read()
14
15 可是对html一点基础也没有,只有上网继续搜索了,在cpyug的邮件列表里找到2个比较
16 实用的例子
17
18 1. 使用python的
19 site_root = 'http://192.168.1.1'
20 username = 'admin'
21 password = '123456'
22
23 passman = urllib2.HTTPPasswordMgrWithDefaultRealm()
24 passman.add_password(None, site_root, username, password)
25
26 authhandler = urllib2.HTTPBasicAuthHandler(passman)
27
28 opener = urllib2.build_opener(authhandler)
29
30 urllib2.install_opener(opener)
31
32 pagehandle = urllib2.urlopen(site_root)
33
34 2,使用 wget的
35
36 wget --http-use=admin --http-password=admin http://192.168.1.1/userRpm/SysRebootRpm.htm?Reboot=重启路由器 -O /dev/null
37
38 这个好用,不用写python了直接使用shell就可以完成任务了,然后自己做个crontab,
39 让它定时执行就ok
40
41 完整的代码如下
42
43 #!/bin/bash
44
45 wget --http-use=admin --http-password=admin http://192.168.1.1/userRpm/SysRebootRpm.htm?Reboot=重启路由器 -O /dev/null
Thursday, September 15, 2011

dnsmasq在arch下建立自己的dns本地缓存
2
3 和win下使用ff根本无法相比,这个问题老早就接触过,在debian,ubuntu下都安装过dnsmasq 做本地dns缓存来解决。arch下是头一次。
4
5 下面是方法:
6
7 1,安装
8 pacman -S dnsmasq
9
10 2,修改dns配置文件 /etc/dnsmasq.conf
11 在 listen-address= 后面添加 127.0.0.1
12 变成这样
13 listen-address=127.0.0.1
14
15 3,不同于debian和ubuntu的一点就是现在arch使用了dhcpcd代替了dhclient,所以配置也就不一样了
16 arch dnsmaq wiki中提到了3中方法,我使用了第3种方法
17 在/etc/Networkmanager/dispatcher.d/中添加一个启动脚本myDNS
18 myDNS脚本内容如下
19 #!/bin/bash
20 #
21 # Override /etc/resolv.conf and tell
22 # NetworkManagerDispatcher to go pluck itself.
23 #
24 # scripts in the /etc/NetworkManager/dispatcher.d/ directory
25 # are called alphabetically and are passed two parameters:
26 # $1 is the interface name, and $2 is "up" or "down" as the
27 # case may be.
28 #
29 # Here, no matter what interface or state, override the
30 # created resolver config with my config.
31 #
32 #cp -f /etc/resolv.conf.myDNSoverride /etc/resolv.conf
33 # 不要改变我删除我原来的/etc/resolv.conf,在第一行添加nameserver 127.0.0.1
34 # Creates a copy of resolv.conf with "nameserver 127.0.0.1" as first line.
35 cat - /etc/resolv.conf <<<"nameserver 127.0.0.1" > /etc/resolv.conf.new
36 cp -f /etc/resolv.conf.new /etc/resolv.conf
37
38 3,修改/etc/rc.conf 使dnsmasq在开机就以DAEMONS运行
39 DAEMONS=(networkmanager dnsmasq ...)
40
41 然后重新启动,察看你的域名解析时间是不是加快了
42 $dig google.com | grep Query
[转载]什么是有衬线字体与无衬线字体(serif vs sans serif)(附“黑体美化”)?
一直搞不明白serif和sans的区别,找到一篇文章,原文地址 http://forum.ubuntu.org.cn/viewtopic.php?t=88959
在西方國家的字母體系,分成兩大字族:serif 及 sans serif。其中 typewriter 打字機字體,雖然也是 sans serif,但由於他是等距字,所以另獨立出一個 Typewriter 字族出來。
serif 的意思是,在字的筆畫開始及結束的地方有額外的裝飾,而且筆畫的粗細會因直橫的不同而有不同。相反的,sans serif 就沒有這些額外裝飾,而且筆畫粗細大致上是差不多。
像 Times、Times New Roman 等都是屬於 serif 的字體,而 Arial、helvetica 則是屬於 sans serif 的字體。
serif 和 sans serif 的一般比較
serif 的字體較易辨識,也因此易讀性較高。反之 sans serif 則較醒目,但在走文閱讀的情況下,sans serif 容易造成字母辨識的困擾,常會有來回重讀及上下行錯亂的情形。
serif 強調了字母筆畫的開始及結束,因此較易前後連續性的辨識。
serif 強調一個 word,而非單一的字母,反之 sans serif 則較強調個別字母。
在很小字的場合,通常 sans serif 會較 serif 字體較為清晰。
適用於不同用途
通常文章的內文、正文使用的是易讀性較佳的 serif 字體,這可增加易讀性,而且長時間閱讀下因為會以 word 為單位來閱讀,較不容易疲倦。而標題、表格內用字則採用較醒目的 sans serif 字體,他需要顯著、醒目,但不必長時間盯著這些字來閱讀。
像 DM、海報類,為求醒目,他的短篇的段落也會採用 sans serif 字體。但在書籍、報章雜誌,正文有相當篇幅的情形下,應採用 serif 字體來減輕讀者閱讀上的負擔。
中文的情況
在中文的情形也是有相當於 serif 的字體,例如明(宋)體就是 serif 的,他通常是和 Times Roman 字族來搭配的。而黑體、圓體就相當於是 sans serif 的字體。
在中文直排的情況,比較不容易顯現 serif/sans serif 之間的差異性,但是在目前中文橫排相當的普遍的情形下,以上所述及的易讀性、醒目性也是適用於中文。
很常看到中文出版書籍、雜誌,內文使用了不易閱讀,但卻很醒目的黑體或圓體,這對讀者來說,在長期閱讀之下很容易就引起眼睛不舒服,似乎是應該盡量避免才是。
| 附件: |

|
[转载] 终端软件的选择:rxvt-unicode
原文地址:http://forum.ubuntu.org.cn/viewtopic.php?t=66302&highlight=rxvt-unicode
为什么是rxvt-uicode
终端软件有很多,gnome有gnome terminal,kde有konsole,还有xfce-terminal,xterm,rxvt, aterm, eterm等等,这里我选择的是rxvt-unicode。主要因为我们所需要的终端,需要具有以下的特性:
符合上面条件的,以我所知,就只有rxvt-unicode(如果我错了请纠正我)。除了这些特性,rxvt-unicode还具有以下特性:
rxvt-unicode的配置
这个配置中有几个地方需要说明一下。
1 字体配置。
字体使用了fixed和文泉驿的组合,两个都是点阵字体。使用点阵字体的好处首先是快,然后就是够sharp。Truetype字体在大字号确实比较好看,但是在终端显示方面,效果明显不如点阵来得美观。
可 惜的是,适合中文的点阵字体实在不多。有个unifont ,不过我没有尝试过。文泉驿是个不错的选择,简体繁体都不错,可惜没有楷体和斜体,所以我没有定义Urxvt.italicFont。但是文泉驿的英文字 型不适合终端显示,扩展ascii的字符部分尤其差,所以一定要搭配一个合适的英文字型。这里我用的是misc-fixed,如果你愿意用更小的字型,你 可以尝试terminus。

2 颜色配置。
可以看出,我把rxvt里面的颜色重新定义了,定义成了tango风格配色,在vim中搭配tango.vim,可以达到很好的效果。tango.vim可以在这里下载。这是我对tango.vim进行了小小修改之后的效果。
Shell配置
shell的选择
我的选择是zsh,因为它的补全功能很贴心,而且我特别喜欢它的walters提示符。如果用bash,bash_completion是一定要装的。
定义更多的ls颜色
大家也许注意到了,ls有颜色显示,是因为有这样一个alias的存在的缘故
我喜欢把自己常用的文件种类都加上颜色,怎么做呢?首先,把默认的颜色配置输出为.lscolor
然后,在.bashrc/.zshrc里面ls的alias前面加上这么一句,以后需要添加新的文件种类,编辑.lscolor就是了。
有用的alias
在.bashrc或者.zshrc里面加入下列alias,可以实现彩色grep,df/du的时候用K/M显示大小,用del命令把文件删除到gnome回收站。用smth上newsmth.org,用hkday上hkday.net,而且发帖不会乱码。
必不可少的screen
什么是screen
screen 这个名字老实说起得很有误导作用,它代表的是一个叫做gnu screen的软件。这个软件的主要作用说简单了,就是给你的终端添加tab的功能。也许你会问,为什么不用gnome- terminal/console/mlterm之类本身就有tab功能的终端呢?为什么不用fluxbox的标题栏tab功能呢?原因很简单,在ssh 或者telnet远程登录的时候,能够让你还能使用tab的,只有screen!

screen的配置
我没有给开新的tab(screen)一个快捷键,因为我觉得无论是敲screen还是ctrl+a
ctrl+c都不是很麻烦。
换个encoding上bbs
screen 可以动态更改encoding,比如想上繁体bbs,只需要依此敲入ctrl+a :encoding big5,然后telnet到你想要上的bbs就行啦。再次看出文泉驿的好处,繁体字都能显示^_^。当然,这样上bbs不如用luit的alias来得 方便。
给特定程序绑个tab
如果你经常用mutt/irssi,或者上某个bbs,可以在screenrc里面加这样几句
不过我更加倾向于直接在bashrc/zshrc里面用alias
为什么是rxvt-uicode
终端软件有很多,gnome有gnome terminal,kde有konsole,还有xfce-terminal,xterm,rxvt, aterm, eterm等等,这里我选择的是rxvt-unicode。主要因为我们所需要的终端,需要具有以下的特性:
- 快速(rxvt-unicode基于rxvt,rxvt基于xterm,xterm的快速是毋庸置疑的);
- 支持utf8,否则不能正确显示简体和繁体中文(从rxvt-unicode的名字就可以看出来了);
- 易配置,更换系统时只需要保留配置文件就能恢复(rxvt-unicode配置可以写在~/.Xdefaults或者~/.Xresources中);
- 支持透明,因为我们需要eyecandy来防止审美疲劳(rxvt-unicode不光支持伪透明,也可以做到真透明,不过我没有试过)。
符合上面条件的,以我所知,就只有rxvt-unicode(如果我错了请纠正我)。除了这些特性,rxvt-unicode还具有以下特性:
- 可以以server/client模式启动,更加节省系统资源(urxvtcd);
- 显示彩色man page。
rxvt-unicode的配置
代码:
Xft.dpi:96
!! RXVT-unicode setting
URxvt.geometry: 80x36+80+80
URxvt.background: black
URxvt.foreground: white
URxvt.scrollBar: False
URxvt.scrollstyle: next
! Use shift+pageup/down to scroll in screen
URxvt.secondaryScroll: True
!set the artificial transparency of the v.t.
URxvt.inheritPixmap: True
URxvt.tintColor: grey
URxvt.shading: 500
URxvt.saveLines: 1500
URxvt.preeditType: Root
URxvt.borderLess: False
URxvt.title: roylez's urxvt
!italicFont and boldItalicFont undefined
URxvt.font:-*-fixed-medium-r-*-*-15-*-*-*-*-*-*-*,\
xft:wenquanyi bitmap song:medium:pixelsize=15:antialias=False
URxvt.boldFont:-*-fixed-bold-r-*-*-15-*-*-*-*-*-*-*,\
xft:wenquanyi bitmap song:bold:pixelsize=15:antialias=False
!URxvt.font:xft:terminus:medium:size=13:antialias=false,\
!xft:wenquanyi bitmap song:medium:pixelsize=13:antialias=False
!redefine color to use tango theme in vim
!Black
URxvt.color0: #000000
URxvt.color8: #555753
!Red
URxvt.color1: #CC0000
URxvt.color9: #EF2929
!Green
URxvt.color2: #4E9A06
URxvt.color10: #8AE234
!Yellow
URxvt.color3: #C4A000
URxvt.color11: #FCE94F
!Blue
URxvt.color4: #3465A4
URxvt.color12: #729FCF
!Magenta
URxvt.color5: #75507B
URxvt.color13: #AD7FA8
!Cyan
URxvt.color6: #06989A
URxvt.color14: #34E2E2
!White
URxvt.color7: #D3D7CF
URxvt.color15: #EEEEEC
这个配置中有几个地方需要说明一下。
1 字体配置。
字体使用了fixed和文泉驿的组合,两个都是点阵字体。使用点阵字体的好处首先是快,然后就是够sharp。Truetype字体在大字号确实比较好看,但是在终端显示方面,效果明显不如点阵来得美观。
可 惜的是,适合中文的点阵字体实在不多。有个unifont ,不过我没有尝试过。文泉驿是个不错的选择,简体繁体都不错,可惜没有楷体和斜体,所以我没有定义Urxvt.italicFont。但是文泉驿的英文字 型不适合终端显示,扩展ascii的字符部分尤其差,所以一定要搭配一个合适的英文字型。这里我用的是misc-fixed,如果你愿意用更小的字型,你 可以尝试terminus。
2 颜色配置。
可以看出,我把rxvt里面的颜色重新定义了,定义成了tango风格配色,在vim中搭配tango.vim,可以达到很好的效果。tango.vim可以在这里下载。这是我对tango.vim进行了小小修改之后的效果。
Shell配置
shell的选择
我的选择是zsh,因为它的补全功能很贴心,而且我特别喜欢它的walters提示符。如果用bash,bash_completion是一定要装的。
定义更多的ls颜色
大家也许注意到了,ls有颜色显示,是因为有这样一个alias的存在的缘故
代码:
alias ls='ls --color=auto -X'
我喜欢把自己常用的文件种类都加上颜色,怎么做呢?首先,把默认的颜色配置输出为.lscolor
代码:
dircolors -p ~/.lscolor
然后,在.bashrc/.zshrc里面ls的alias前面加上这么一句,以后需要添加新的文件种类,编辑.lscolor就是了。
代码:
eval '`dircolors -b $HOME/.lscolor`'
有用的alias
在.bashrc或者.zshrc里面加入下列alias,可以实现彩色grep,df/du的时候用K/M显示大小,用del命令把文件删除到gnome回收站。用smth上newsmth.org,用hkday上hkday.net,而且发帖不会乱码。
代码:
alias grep='grep --color=always'
alias less='less -R'
alias df='df -Th'
alias du='du -h'
del() {mv -vi -- $* ~/.Trash}
alias smth='luit -encoding gbk -- telnet newsmth.org'
alias hkday='luit -encoding big5 -- telnet hkday.net'
alias less='less -R'
alias df='df -Th'
alias du='du -h'
del() {mv -vi -- $* ~/.Trash}
alias smth='luit -encoding gbk -- telnet newsmth.org'
alias hkday='luit -encoding big5 -- telnet hkday.net'
必不可少的screen
什么是screen
screen 这个名字老实说起得很有误导作用,它代表的是一个叫做gnu screen的软件。这个软件的主要作用说简单了,就是给你的终端添加tab的功能。也许你会问,为什么不用gnome- terminal/console/mlterm之类本身就有tab功能的终端呢?为什么不用fluxbox的标题栏tab功能呢?原因很简单,在ssh 或者telnet远程登录的时候,能够让你还能使用tab的,只有screen!
screen的配置
代码:
# 这是配置那个tab bar
hardstatus alwayslastline
hardstatus string '%{=b}%{b}%-w%{.BW}%10>[%n %t]%{-}%+w%< %=%{G}%C%A, %Y-%m-%d'
termcapinfo xterm|rxvt ti@:te@
# screen里面的所有进程退出,screen就自动退出
autodetach on # default: on
# 退出vim/nano之后自动刷新屏幕
altscreen on
# 启动等待,显示版本
msgwait 2
version
# 启动信息
startup_message off # default: on
# 启用beep报错
vbell off
# 默认的shell,不设置的话就是bash
shell zsh
## Keybindings ##
# F10改标题
bindkey -k k; title
# F11左边的tab
bindkey -k F1 prev
# F12右边的tab
bindkey -k F2 next
我没有给开新的tab(screen)一个快捷键,因为我觉得无论是敲screen还是ctrl+a
ctrl+c都不是很麻烦。
换个encoding上bbs
screen 可以动态更改encoding,比如想上繁体bbs,只需要依此敲入ctrl+a :encoding big5,然后telnet到你想要上的bbs就行啦。再次看出文泉驿的好处,繁体字都能显示^_^。当然,这样上bbs不如用luit的alias来得 方便。
给特定程序绑个tab
如果你经常用mutt/irssi,或者上某个bbs,可以在screenrc里面加这样几句
代码:
bind 'm' screen -t email mutt
bind 'i' screen -t chat irssi
bind 's' screen -t smth luit -encoding gbk -- telnet newsmth.org
bind 'i' screen -t chat irssi
bind 's' screen -t smth luit -encoding gbk -- telnet newsmth.org
不过我更加倾向于直接在bashrc/zshrc里面用alias
代码:
alias mutt='screen -t email mutt'
代码:
_______________________
< 是不是应该给点掌声? >
-----------------------
\ ^__^
\ (oo)\_______
(__)\ )\/\
||----w |
|| ||
< 是不是应该给点掌声? >
-----------------------
\ ^__^
\ (oo)\_______
(__)\ )\/\
||----w |
|| ||
[转载]shell的显示git分支ps1
别搞错了, 是Shell的提示符:PS1,不是Play Station One。(-。-)
这个PS1的目前有两个功能:高亮所有不为0的返回值,显示Git分支。
效果如图:
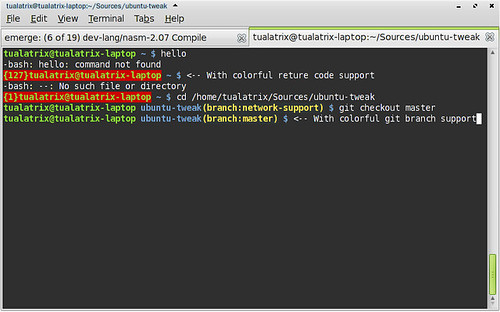
你可以看到,当我在Shell中打“hello”时,在显示了“command not found”以外,还把Shell的PS1提示符弄红了,在前面还有返回值:127。方便了在发生错误的情况下得到注意。
此外,作为一个Git用户,当进入一个Git仓库时,会用灰底黄字显示当前的分支信息,一目了然。
实在是方便!PS1也能加入超多的功能!
当然这些都不是原创的,只是稍微改了下,是向bones7456和albert学的。
下面就是这个PS1,很晕吧:PS1='`a=$?;if [ $a -ne 0 ]; then echo -n -e "\[\e[01;32;41m\]{$a}"; fi`\[\033[01;32m\]\u@\h\[\033[00m\] \[\033[01;34m\]\W`b=$(parse_git_branch); if [ x"$b" != "x" ]; then echo -n -e "\[\e[33;40m\](branch:$b)\[\033[01;32m\]\[\e[00m\]"; fi`\[\033[01;34m\] $ \[\e[00m\]'
如果你也想用的话,从我的Git仓库中,取出样本,放进你的~/.bashrc里吧。记得不要少了parse_git_branch这个函数。
http://github.com/tualatrix/configs/tree/master
转载源地址: http://imtx.me/archives/1298.html
gnome shell hijack to show ibus(顶栏显示ibus状态)
 1 现在使用gnomeshell因为ibus状态栏在底部通知栏,使用vim,gvim还有firefox的pentadactly扩展
 2 的时候老看不到输入法状态,导致很多快捷键无法运行,很是恼火。
 3
 4
 5 近日看了看gnome-shell的通知区域的设计,发现gnomeshell本意是把ibus放在顶面板的,由于和ibus
 6 输入法的沟通没有做好,导致通知区域的的ibus名称不正确,所以,我们的ibus也就毫无办法的到了
 7 底部通知栏...
 8
 9 察看原码
10
11 statusIconDispatcher.js文件在/usr/share/gnome-shell/js/ui目录下
12
13
14
15 const STANDARD_TRAY_ICON_IMPLEMENTATIONS = {
16     'bluetooth-applet': 'bluetooth',
17     'gnome-volume-control-applet': 'volume', // renamed to gnome-sound-applet
18                                              // when moved to control center
19     'gnome-sound-applet': 'volume',
20     'nm-applet': 'network',
21     'gnome-power-manager': 'battery',
22     'keyboard': 'keyboard',
23     'a11y-keyboard': 'a11y',
24     'kbd-scrolllock': 'keyboard',
25     'kbd-numlock': 'keyboard',
26     'kbd-capslock': 'keyboard',
27     'ibus-ui-gtk': 'input-method'//看到没有ibus-ui-gtk多少年前的东西了..
28 };
29
30 一个简单的小hack只要把'ibus-ui-gtk'改为'main.py'就可以了
31
32 const STANDARD_TRAY_ICON_IMPLEMENTATIONS = {
33     'bluetooth-applet': 'bluetooth',
34     'gnome-volume-control-applet': 'volume', // renamed to gnome-sound-applet
35                                              // when moved to control center
36     'gnome-sound-applet': 'volume',
37     'nm-applet': 'network',
38     'gnome-power-manager': 'battery',
39     'keyboard': 'keyboard',
40     'a11y-keyboard': 'a11y',
41     'kbd-scrolllock': 'keyboard',
42     'kbd-numlock': 'keyboard',
43     'kbd-capslock': 'keyboard',
44     'main.py': 'input-method'//就是这里,改了就ok了..
45 };
46
47 写成脚本就是下面的了:
48 ibus extensions
49
50 1   StatusIconDispatcher = imports.ui.statusIconDispatcher;
51 2
52 3   function main() {
53 4       StatusIconDispatcher.STANDARD_TRAY_ICON_IMPLEMENTATIONS['main.py'] = 'ibus';
54 5   }
gnomeshell 标题框显示 最小化 关闭按钮
1 gnomeshell使标题框显示放大缩小关闭的小技巧
2
3 gconftool-2 -s -t string /desktop/gnome/shell/windows/button_layout "minimize:close"
Wednesday, September 14, 2011
gnome shell恢复默认设置
2
3 今天我就遇到了,上irc,没有结果,只有自己动手了.
4
5 在 http://forums.fedoraforum.org/showthread.php?t=267061
6 上找到了解决的办法
7
8 -使用 ctrl+alt+F2 返回一个虚拟终端
9 -登陆进去,然后执行一下的命令
10
11 rm -rf ~/.config/
12 rm -rf ~/.gconf/
13 rm -rf ~/.gconfd/
14 -然后回到gdm的登陆界面(ctrl+alt+F7),登陆进去
15
16 这个将完全删除所有基于GNOME3/gtk3的程序的默认配置
Archlinux 字体美化+配置
 1 安装好arch使用了gnome-shell,在安装的过程中也安装了ttf-dejavu和wqy-microhei字体,可是显示的效果总让人很无奈。
 2
 3 于是使用gnome-tweak-tool改变了字体的设置,使用microhei显示所有字体,可是效果还是有点不那么爽。
 4
 5 上网挂google搜到这么一篇文章 Archlinux字体美化+配置
 6
 7 于是按照上面文章所说使用 ubuntu打了补丁的程序替代原有的arch的字体渲染补丁。
 8
 9 1,安装字体:
10 pacman -S ttf-dejavu
11 yaourt -S wqy-microhei
12 2,安装补丁:
13 yaourt -S cairo-ubuntu libxft-ubuntu freetype2-ubuntu fontconfig-ubuntu
14 3,配置文件:~/.fonts.conf
15
16 <fontconfig>
17
18    <match target="pattern">
19       <test qual="any" name="family">
20          <string>serif</string>
21       </test>
22       <edit name="family" mode="prepend" binding="strong">
23          <string>DejaVu Serif</string>
24          <string>WenQuanYi Micro Hei</string>
25       </edit>
26    </match>
27
28    <match target="pattern">
29       <test qual="any" name="family">
30          <string>sans-serif</string>
31       </test>
32       <edit name="family" mode="prepend" binding="strong">
33          <string>DejaVu Sans</string>
34          <string>WenQuanYi Micro Hei</string>
35       </edit>
36    </match>
37
38    <match target="pattern">
39       <test qual="any" name="family">
40          <string>monospace</string>
41       </test>
42       <edit name="family" mode="prepend" binding="strong">
43 <string>DejaVu Sans Mono</string>
44          <string>WenQuanYi Micro Hei Mono</string>
45       </edit>
46    </match>
47
48 </fontconfig>
49
50 //4,网上流传的通用字体配置文件:http://www.linuxsir.org/bbs/thread339541.html
Tuesday, September 13, 2011
指定git使用其他sshkey
一般使用第三方code hosting网站(如GitHub)需要上传你的
sshkey公钥,这个步骤很简单,网上一搜就有。不过有些情况你不想用默认的~/.ssh/id_rsa和id_rsa.pub作为你的sshkey,
因为你希望在github这类网站上就使用一个sshkey公钥,然后在不同的机器上都使用这对公私钥,省得制作一堆key上传麻烦。
原先以为可以通过git自身的设置来达到目的,后来意识到和它没关系,仅仅需要配置下ssh就行。 在~/.ssh/config文件附加下面一段:
原先以为可以通过git自身的设置来达到目的,后来意识到和它没关系,仅仅需要配置下ssh就行。 在~/.ssh/config文件附加下面一段:
    Host github.com       #  必须写一样的hostname,因为是要ssh xxx@github.com
    HostName github.com
    User git              #  不是你在github上的账户,必须是"git"
    IdentityFile ~/.ssh/yet_another_key  #  其他sshkey
在把~/.ssh/yet_another_key.pub上传至github后,运行ssh -v
github.com可以看看整个过程。以后,git clone git@github.com:USER/PROJECT.git、git push
origin master等等操作都会使用你指定的sshkey来验证。
指定git使用其他sshkey
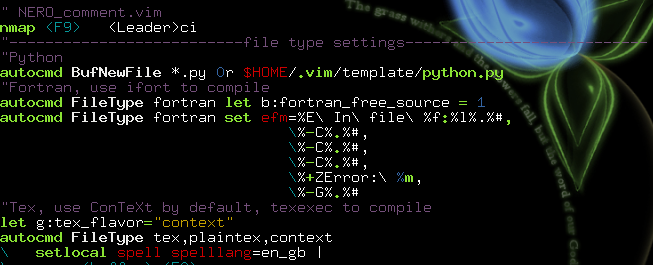
blog代码高亮
2
3 :TOhtml
4
5
6 把生成的文件里的内容考到Blogger的html编辑器里就行了。如果需要显示行数,就先在vim里执行
7
8 :set nu
9
10
11 如果本来有行数,但不想把行数贴上来,就执行
12
13 :set nonumber
14
15
16 然后再TOhtml 其实不放在blockquote标签里也行,但是blockquote标签本身带有一些性质,比如说缩进,边框之类的。效果见上一篇blog
17 由于不知道什么原因,需要在TOhtml之前执行
18
19 :let g:html_use_css=0
20
21 这样形成的代码就不使用css,而完全使用html本身指定颜色,如果使用css的话,firefox不会自动换行,而opera和chromium都可以。所以还是用html保险一点。
22 如果需要显示html代码本身,需要
23
24 < 替换为 <
25 > 替换为 >
26 " 替换为 "
27 & 替换为 &
Subscribe to:
Posts (Atom)